Jamie Moffatt
Jamie is a Postdoctoral Researcher in Psychology, based at Durham University.

Theme adapted from midnight by mattgraham
- Email: jamie.moffatt@durham.ac.uk
- Bluesky: @jamoffatt.bsky.social
- Github: jamie-moffatt
This short tutorial will guide you through the first steps of downloading and using jsPsych, a JavaScript plugin that allows for fully customisable online psychology experiments.
1. Download and organise jsPsych
Download the latest version of jsPsych
Go to the following link: jsPsych Latest Releases and download the latest version of jsPsych. The .zip file is the most straightforward to download and install.
Once it is finished downloading, go to the zipped folder (usually in your “Downloads” folder). Right click the folder and select “Extract all”. Choose somewhere on your computer where you would like to create your experiments. I created a folder called “My-Experiments” and placed the jsPsych files within this folder. Whichever folder you choose, it should look something like this:
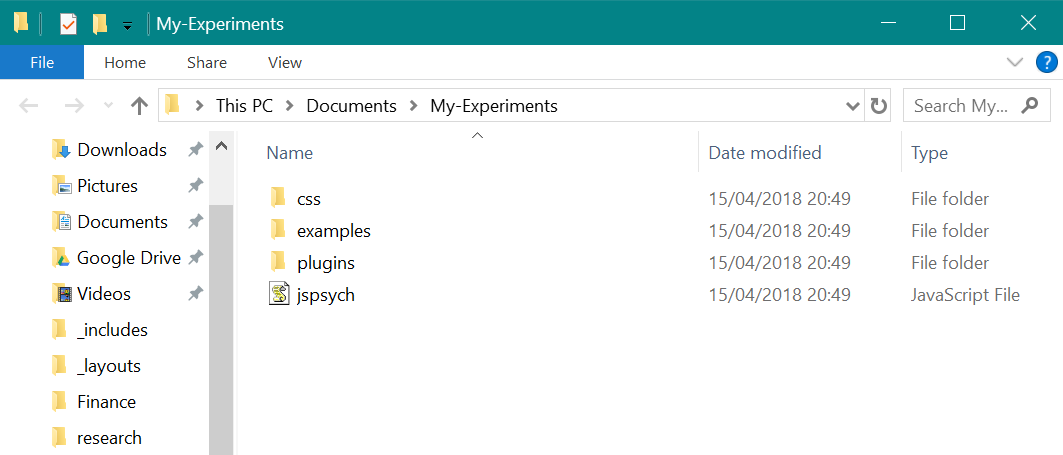
- css: This folder contains some default css stylesheets, to make your website look pretty!
- examples: This folder contains (you guessed it) examples of things to do in jsPsych. If you ever find yourself stuck trying to do something, I’d recommend having a look in here for some inspiration.
- plugins: This folder contains the plugins for jsPsych. I’ll explain in a bit more detail later what these do, but plugins are what make jsPsych tick, along with…
- jspsych.js: This is the master JavaScript file for jsPsych. You should never need to edit this, unless you really know what you’re doing!
2. Get a good text editor
You’ll be writing your experiments with a mixture of HTML, CSS and JavaScript. To write and edit these files, you will need a text editor such as Atom, or Notepad++. Avoid using Microsoft Word. The way Word documents are saved means they come with a lot hidden formatting, which could make your code unreadable. Writing in coding languages is much easier in a text editor, such as those listed below.
To install a text editor, select one of the following links and follow the download instructions:
3. Create an HTML file
You’ll be creating your first jsPsych script in HTML. Open up your text editor and create a new file. Then, save it as something memorable (e.g. “my-first-file.html”) in the folder with your jsPsych files. Make sure to include the “.html”!
In the file, type or copy over the following:
<!DOCTYPE html>
<html>

<head>
  <title>My title</title>
</head>

<body>
</body>

<script>
</script>

</html>
The <html> tags tell any program that this script is in HTML. The <head> tags are where to put general information about the script - for example, you would put your title here in <title> tags. The <body> tags are where to put the actual content of the html page - any paragraphs, images or links. There are plenty of resources available online to learn HTML, and not much knowledge of the language is needed to design experiments in jsPsych, so I won’t go into much more detail here.
4. Prepare the HTML file for jsPsych
Before you begin creating your experiment, you will need to import the jsPsych library. This is done by entering <script> tags in your <head> section. Within the <script> tag, you need to specify the path to your jsPsych master script with src="jspsych.js". See the example below:
<head>
  <title>My title</title>
  <script src="jspsych.js"></script>
</head>
You might also want to import the default jsPsych stylesheet. This will make your experiment look good, with minimal effort on your part. Just add the following in <link> tags:
<head>
  <title>My title</title>
  <script src="jspsych.js"></script>
  <link href="css/jspsych.css" rel="stylesheet" type="text/css"></link>
</head>
5. Create a jsPsych Trial
Trials in jsPsych are defined using plugins. Most of your experiment will be written using jsPsych plugins, so I’ll briefly explain what they are. If you look in your plugins folder, you will see a range of JavaScript files. Each of these files provides functionality for a specific thing that you might want to do in a trial. For example:
- The “jspsych-instructions” plugin is for displaying pages of instructions to a participant.
- The “jspsych-survey-likert” plugin is for creating likert-style surveys.
- The “jspsych-image-keyboard-response” plugin is for displaying an image, and waiting for a keyboard response.
For this tutorial, we are going to use the “jspsych-instructions” plugin to write out some text on the screen.
Whenever you want to use a specific plugin, you will need to import it at the beginning of your script, in the same way that you imported the jsPsych library. In your <head>, write <script></script> tags and define the source (src) as the path to the instructions plugin, like so:
<head>
  <title>My title</title>
  <script src="jspsych.js"></script>
  <script src="plugins/jspsych-instructions.js"></script>
  <link href="css/jspsych.css" rel="stylesheet" type="text/css"></link>
</head>
We are now going to create your first trial, using the instructions plugin. Within your <script></script> tags (the ones after your <body></body> tags), write out the following:
<script>

var instructions_page = {}

</script>
This code creates a new variable (var) called instructions_page. This variable defines a single trial of our experiment. Within this variable, we can define certain parameters which will affect how the trial will run. These should be written in {} tags, with a comma separating each parameter.
The first parameter of any trial should always be type: followed by the name of plugin you wish to use, in quotation marks. Here we set type: 'instructions'.
In the instructions plugin, text is defined using pages:, with the text you want to write in quotation marks, within [] brackets. So here we set pages: ['Hello! Welcome to the experiment.'].
This should look something like this (don’t forget the comma to separate each line!):
<script>

var instructions_page = {
  type: 'instructions',
  pages: ['Hello! Welcome to the experiment.']
}

</script>
Some parameters are consistent across all plugins (like type:), while others are unique to specific plugins (like pages:). A list of parameters that each plugin uses, along with explanations on what they do, can be found on the jsPsych website.
6. Run your experiment
After your new variable, write out the following code:
jsPsych.init({
  timeline: [instructions_page]
})
The jsPsych.init({}) function tells jsPsych to run the trials that you have created, and is a requirement for every experiment you will write. The timeline parameter is where you define your trials, and in what order they will play out. For now, the timeline will consist of just the instructions_page variable.
And that should be that! Open your folder in your preferred web browser to see your first jsPsych experiment! This can be done by double clicking the file or, if that doesn’t work, right click the file and select “Open with” and choose your browser.
At the bottom of the page, I’ve written exactly what the script should look like. If your experiment isn’t working, check it against this script. Make sure to check closely that it matches - 99% of my coding mistakes come from simple things, like writing a full stop instead of a comma.
<!DOCTYPE html>
<html>

<head>
  <title>My title</title>
  <script src="jspsych.js"></script>
  <script src="plugins/jspsych-instructions.js"></script>
  <link href="css/jspsych.css" rel="stylesheet" type="text/css"></link>
</head>

<body>
</body>

<script>

var instructions_page = {
  type: "instructions",
  pages: ['Hello! Welcome to the experiment.']
}

jsPsych.init({
  timeline: [instructions_page]
})

</script>

</html>